Thursday, December 3, 2009

my last post where i wish it was summer... promise


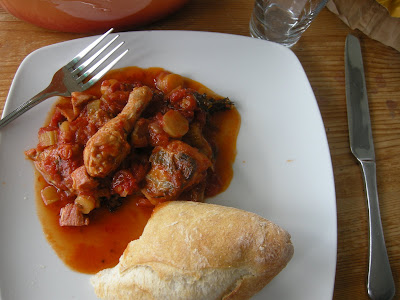
im just going to stop saying sorry for not posting. i am a busy lad, and it just happens. recently, ive been espically busy. long days, and short sleeps make for a tired brain. and in my moments of lapse, i find my thoughts escaping to the recently ended summer (yes, again). this winter has certainty not kicked into high gear yet. its mostly damp and grey, but not biting cold. but it isnt really the weather that has me in a reminiscing mood. it was specifically my outdoor office. you see, work is much easier when you have an outdoor office, with wi fi internet and bay windows. you might not think this, but it ramped up my productivity. i never daydreamed about better days gone by when i was sitting in my own little piece of paradise (seriously, its that good). i just enjoyed the simple comfort of not having to work in doors, chained to a desk... looking out the window. the simple pleasures enjoyed there extended to other parts of my life, including cooking. i went through a whole phase of "simple is better"... and it really is. nothing could be more simple than 3 ingrediant tomato sauce, served on Cappalini pasta and some rapini on the side. it is truly one of my favorite dishes. and its totally veggie, although it also goes well with a pork loin cutlet simply fried with some salt and pepper.

3 (but kinda 5) ingrediant tomato sauce

Ingrediants

4 or 5 large cloves of garlic finely diced

1 can of good quality italian tomatos

half a cup of high quality italian olive oil

salt and pepper to taste (these two dont count as ingrediants today)

i know the olive oil might seem a bit much, but trust me, the more the better!

Directions

1. add a medium pan to medium-high heat on the oven. when the pan is hot add olive oil and heat through.

2. add the garlic to the oil and give it a quick stir to make srue it is evenly distributed around the pan and cook for one or 2 minutes. you want to just cook the garlic, not letting it get too much colour. add the can of tomato's and mash the whole tomatos with a potato masher until they are broken down. partially cover and let cook for 30 - 40 minutes, stiring ever 10 minutes. when it is done, some of the water should have evaporated and it should have a slightly chunky, but not too thick of a texture. remove from heat, add salt if it needs it, and let sit

3. heat a pot of water, salted till it tastes like the sea, on the stove top. once at a rigorous boil add your pasta and boil for 2 to 3 minutes. you want to make sure the pasta has slightly more bite than aldente. drain the pasta and put back in the pot. put the pot back on the burner at medium-high and add small amount of the sauce to the pan. cook for 1 minute, or until pasta is aldente. remove from heat and serve the pasta in a big bowl! add a little more sauce to the top, if that is your thing, and grate some of your favorite hard cheese on top. serve with some steamed rapini tossed with olive oil and some flur de sel. this is the perfect quick afternoon meal and is great the next day. enjoy!

Wednesday, November 11, 2009

ever fry your bread? you should...


i am sorry blog followers, i have neglected you. there is however an old saying that goes "life is like..." wait no, not that one.... ahhh yes, "distance makes the heart grow fonder". so by that logic, you should all be quite fond of me now. this sentiment is possibly most true when the Canadian summer abruptly ends and the cold brisk Canadian fall kicks in. this transformation brings to mind another old colloquialism "holy shit, its cold outside". as soon as that cold snap kicks in i immediately think to the last days of August when the heat and sunlight were so abundant, one couldn't imagine it could possibly end... and as it has for the last 28 years of my life, i am well surprised when the warmth is quickly ushered out by the turning leaves and autumn jackets by mid October. i end up yearning to get on my bike and go to the market whenever i damn well choose, but my brown skin was not made for such weather. oh man... this is not cheering me up at all... I have chosen a recepie that perhaps has more roots in the summer due to his ingredients, but to hell with it... i miss summer and i want to eat fried bread with a tomato and pepper salad. this is where i get to be nerdy about food (yesssssssssssss!!!). most people call this bruschetta, but really burschetta is grilled bread with garlic rubbed into it and a drizzle of olive oil. this version has butter, the bread is fried, and there is no garlic. you can call it what you want - i call it a "holy shit, its cold outside" remedy. the golden brown fried bread is the star here... its what separates this dish from other burchetta... you have to be really mindfull when you are cooking it not to burn it... keep a watchfull eye.


Ingrediants

3 slices of caraway rye bread, cut into halvs

2 diced medimum sized red tomatos (i used hot house, and it worked great... you can use whatever kind you like)

1 half yellow pepper, diced

1 half orange pepper, diced

1/3rd of a red onion in a fine dice

1 tablespoon flat leaf parsley, diced

1 squeeze of lemon juice

zest of half a lemon

1.5 tablespoon white wine viniger

2 tablespoons olive oil

salt and pepper to taste

butter for bread.

Directions

1. put a large pan with a heavy bottom on medium high heat and allow to get hot.

2. in a bowl, mix the tomato, peppers, red onion, lemon juice, white wine viniger, parsley, black pepper, and half the oil. set asside. do not add the salt because it will wilt the veggies.

3. butter your bread on both sides all the way to the edges and cut the bread in half down the middle. it is important to not miss any of the surface of the bread because the butter is what will give it a very nice golden brown color.

4. add the bread to the pan being very mindful no to burn the bread. you might have to adjust your temp down, but you want the bread to hit a nice and hot pan so it starts to cook right away. try to use your best judgement here... like i said, this is the deal breaker in this meal.

5. once the bread is a nice golden brown on one side, flip it. add the remaining oil to the pan. this will give the bread more flavour and some extra crunch, but wont make the bottom of the bread super greasy, so you can still eat it with your hands. once the bread is golden brown on both sides, remove from the pan and put on a plate. add the salt to the veggies, mix, and spoon onto the bread

the warm crunchy bread gives a great contrast to the fresh summery veggies. its a wonderful, and truly easy dish to make. you can eat it on its own for lunch or as an app, or serve with a nice piece of fritatta with mint an picorino

Friday, November 6, 2009

im a bad blogger

ok, so ive been retardo-danardo busy over the past few weeks, and havent posted anything, but here is something that should tide you over. my friend Ryan started his own food blog (i know, right??!!). its not bad (But really, it looks, tastes, and smells, better than mine already. bummer).

i promise i will have some good posts soon. im actually just waiting on some pictures. promise promise. for reals.

peep the saucy coq now: http://thesaucycoq.com/

Tuesday, October 6, 2009

good boys love their mothers.


when i was growing up my house was always a place for entertaining. my dad would wake up early and start me on the cleaning: hoover the whole house top to bottom, mop the tiled floor in the hallway and the kitchen, dust the base boards, and polish the banister, windex the windows and the glass coffee table. Needless to say, i hated the preparation of having people over. but the pay off was huge. aunties and uncles getting drunk and swearing (there was otherwise no cussing in my house. even "fart" was considered a bad word), the booze would flow and if i got to wait around enough i got to hear a couple dirty jokes. if i got rrrrrrrrrrrrrreally lucky, i got a sip of my dad's creme de menthe after supper. to me this was golden. the words "best ever" come to mind. even after i was sent upstairs to play, i would sit at the top of the stairs hiding as best i could to catch what the grown ups might do next. nothing really exciting ever happened, but just knowing i was amongst the grown ups made me feel like i was somehow more grown up myself. the food was always amazing and always in great abundance. The main course usually consisted of a magnificent roast that my mother would bring to the table and serve. it was with a great deal of pride that my parents gave this food to our hungry guests. through experiencing these dinners it was was handed down to me that one of the best gifts in life is that of giving a meal to a friend. it is a simple gesture, but one that implies so much. there isn't much else that gives me as much joy as bringing food to a table of hungry friends and watching them as they become full and happy. just thinking of it makes me smile.

i would like to thank my parents for showing me that so much joy can be had by giving to others; and so i would like to dedicate this post to my mom, who celebrated a birthday just last week. i love you so much mom. thank you for teaching me this, and all the other wonderful things you have shared with me over my short life here. i would not be half the man i am today with out you being the wonderful woman you have always been.

Pork Rib Loin Roast with Herbs and Roasted Apples

Ingredients

1 4 - 4.5 pound rib roast (make sure your butcher takes off all the bones except for the ribs)
2 tables spoons Dijon mustard
3 sprigs thyme, separated
2 sprig rosemary leaves, separated
1 tablespoon maple syrup
1/2 cup shallots chopped very fine
3 table spoons olive oil, divided 2 - 1
1/3 cup dry vermouth or white wine
4 royal gala apples, pealed and cut into four (you are going to want to wait to peal and cut them
1/2 cup no salt chicken stock
3 nobs no salt butter
salt and pepper to taste

Directions

1. Preheat oven to 375°F with rack in middle.

2. Pat pork dry and season with LOTS salt and pepper. Straddle a flameproof roasting pan over 2 burners, then heat 1 Tbsp oil over medium-high heat until it shimmers. Brown pork on all sides, then transfer to a large plate.

3. Put a metal rack in pan . Stir together shallots, herbs, maple syrup, mustard, and 2 Tbsp oil and smear over top and sides of roast, then put roast, fat side up, on top of herbs. Pour a little stock in the bottom of the roasting pan to prevent the drippings from burning too much. Roast 1 hour.

4. Add the apples to the pan with the drippings and Continue roasting until an instant-read thermometer registers 140 to 145°F, 5 to 15 minutes more (temperature will rise 5 to 10 degrees as it rests). Transfer pork to a cutting board and let rest 15 to 25 minutes

5. while the pork rests add the remaining stock to the roasting pan and gently stir around the apples to incorporate all the pan drippings and the stock. put back in the oven and cook for an additional 15 minutes. take the apples out of the oven and add the butter and stir. taste the sauce and add salt and pepper as needed. you should have a nice dark, rich, thick sauce.

6. cut the pork into one rib chops... they are big so watch out. cover with apples and pan jous. serve with roasted carrots, roasted onions, baby potato's, and fresh green peas tossed in butter. enjoy.

Thursday, September 17, 2009

Cornish Hen with Stuffed Skin.


about a month ago i got the chance to cook a 3 course meal for my good friends Zyanna and Gordie for their 4th anniversary. it was an honor that they would trust ME to be a part of their celebration. i really think they had a great time and enjoyed the food. i decided that i should go with what i know works and make what i would call my signature dish. Roasted Cornish Hen w. Herb and Garlic stuffed skin. This is a staple of Sunday dinner at my place when I have friends over and by far my fave way to cook a roast hen. I served it with some green beans and an onion and leak risotto with a rather refined fig sauce that i often serve with it. it was a great pleasure to give close friends such an intimate gift on such an auspicious occasion. I would like to thank both of them by dedicating this recipe to them.

PS Gordie (aka Gordon Ball) will be showing his latest set of wonderful pictures at the Sleeping Giant Gallery @ 789 Dundas St. West in Toronto starting Sept 18 (today) and going till Sept 25. i suggest that you go and buy stuff from him while its still affordable.

Cornish Hen w. Herb and Garlic stuffed Skin and Fig Sauce

Ingredients

CORNISH HENS

2 Cornish hens, halved and cleaned

1/4 cup marjoram chopped

1/4 cup sage chopped

1/4 cup thyme leaves chopped

1/8 cup Rosemary leaves chopped

1 table spoon coarse sea salt

5 large cloves of garlic, chopped fine

very soft, but not liquid, butter... enough to coat the 2 hens

pepper to taste

FIG SAUCE

8-10 dried figs

3/4 cup chicken stock

1/4 cup semi dry white wine

1 shallot

1 teaspoon white wine vinegar

2 teaspoons maple syrup

salt to taste.

couple nobs of butter

Cooking Directions - Hens

1. turn your oven to 400 and allow to heat up.

2. combine all ingredients in a bowl except for hens and butter.

3. using your finger, poke a small hole in the membrane between the chicken breast and skin. i find it best to do this where the breasts were cut apart at the meatiest part. you only want the hole big enough for you to stick your finger in and poke the stuffing around. using 2 fingers, put some of the herb and garlic mixture under the skin, and moving it around so it coats the flesh evenly. do the same for the thigh by making a similar hole where the thigh meets the back bone. you will have to use your finger to push the stuffing all the way to the leg. repeat for the three remaining hen halves.

4. place the hens on a rack in a roasting pan and using your fingers cover the hens with the butter. cook the hens for 45 minutes to 1 hour basting the birds every 10 to 15 minutes. they should come out of the oven a deep golden brown. remove from pan, cover with tinfoil and set aside.

Fig Sauce.

1. using half of the chicken stock, de glaze the roasting pan making sure to scrape up all the brown bits with a wood spoon. poor into a bowl and reserve.

2. heat a sauce pan on medium heat and add one nob of butter. let melt and add the chopped shallot. cook until soft, about 4 minutes. add white wine and reduce to about half. add the chicken stock and the reserved pan drippings with the dried figs. using a potato masher, smash the figs to make sure they release all their flavour. reduce by half. add vinegar and maple syrup. and cook for an additional 2 minutes. by this time the sauce should be getting quite thick. remove from heat and add the final knob of butter.

3. take a fine mesh strainer and line with cheese cloth. pass the sauce through the strainer being careful to remove all the fig seeds. you should be left with a rich, smooth, and wonderful tasting sauce. re-heat and add salt and pepper to taste.

serve the dish with roasted potato's or risotto and spoon over the sauce. enjoy.

Friday, September 11, 2009

BBQ Tenderloin of Pork


so ive made a pretty big deal this summer about how many bbq sauces i tried. somewhere around 40 is what i figured the number was. like all good stories, i embellished and its prolly actually somewhere around 30. I was asked by my good friends at Tiger Distribution (who put some of your favorite brands like WESC, Brixton, Penfield, New Balance, and PF Flyer in the coolest stores across the country) to cater for a roof top bbq for 50 people. i had never done anything like that before and they wanted me to do it all from 1 small bbq. i had to bring my bbq from home too. it was a little hectic (not due at all to the fact that i was totally high on drugs and booze) but i got through it and the whole thing was a huge success. people loved it. i cooked some bbq veg, bbq broccoli, chicken drums, honey garlic shrimps... but the king of the bbq was the pork. a whole bbq'ed tenderloin dry rubed, slathered in sizzling bbq sauce, rested, then sliced. it is easily the best bbq dish i make and by some accounts, the best thing i have ever made.

i dedicate this post to the guys at Tiger who outfit me and all my clients (for those who dont know, im a manager for musicians, DJ's, and producers). Ian, Jesse, Leather, Banan, Ash, Shya, and everyone else there, thanks for all your support and free clothes!

BBQ Pork Tenderloin

Ingredients

4 pork tenderloins about 1.5 pounds each, cleaned. (i dont cut off the small tale, i keep it for people who like their pork well done)

Rub

equal parts: dried onion, dried garlic, dried ginger, black peppercorns, fennel seed, mustard seed, ground into a course powder in a mortar and passel.

salt to taste

BBQ SAUCE

2 cups katchup

juice of half a limon

3/4 cup lousiana hot sauce

1 table spoon worchestershire sauce

2 table spoon dark soy sauce

1 table spoon light soy sauce

1/3 a cup fancy molasas

half cup brown sugar, packed

1/3 a cup maple syrup

3 heaping tables spoons of whole wet mustard

1/8 cup of white basalmic viniger

1/8 cup apple cider viniger

one small pinch cheyeanne pepper

cooking directions.


1. Add the rub to a baking dish that is large enough to use to roll the tenderloins in. take the tenderloins one at a time and roll them in the rub. the rub should cover every red inch of the pork. roll it, press it, sprinkle it. whatever you have to do to get the rub on there. set asside for 30 minutes to an hour.

2. combine all of your ingrediants for the bbq sauce in a bowl and mix with a wisk until completely combined. set asside. turn your bbq on high and allow to heat up.

3. once the BBQ is well hot, take the tenderloins and place them on the grill. you want to cook them untill you see some char and then turn them, repeating this process on all sides. once the rub is nice and cooked lower your temp to medimum and put a generous helping of BBQ sauce on all sides. close the lid for 2 or 3 minutes and then turn and repeat. do this untill the pork is cooked to medimum, about 4 or 5 turns or 15 or so minutes. you should have a thick layer of bbq sauce and rub on the ouside of the tenderloin.

4. let the tenderloin sit for 5 or 6 minutes. this will cook the meat till it is medimum well (just a little pink in the middle). slice into 2 or 3 inch peces and serve with mashed potato's and corn on the cob. enjoy

**sorry for the shitty pictures of this one. i will be having one last bbq in a couple weeks, so i will try to get a good one there.

Wednesday, September 9, 2009

NEW PICTURE


big ups to Rhek, seen. the Vancouver based owner of Sharks & Hammers hooked up a very awesome new picture for INPIJBAL. he also eats food, which is what this blog is all about.

thanks Rhek!

Sunday, September 6, 2009

Tomato Salad


there are two reasons that i like simple recipes on this blog. 1) it takes a long time to write these posts. im not a chef, or a particularly good writer (as if you hadn't noticed), so i do a lot of checking, fixing, rechecking, re fixing. i also do them late at night, after work and some funny cigarettes and that doesn't really help the process much. 2) i like the fact that food can taste very good, without much being done to it. now, i like to make fancy meals some times. i would like to think i am pretty good at it. but what really satisfies me is the taste of a good ingredient. some more advanced cooks might think that some of the recipes i post are a little basic, but they are also very very tasty. That is, after all, the goal here. not to showcase my skills as a cook, but to show people out there that there is highly accessible food that can be used on a very high level with simple applications.

yesterday was my good friend Rob's birthday and i had him over for some food with another friend of ours. I made some corn chowder, roasted cornish hens, and a heirloom tomato salad. Shout outs once again to the Jean Tallon market for coming correct. if you don't know what a heirloom tomato is, look it up. there are many other places that can explain it better than i can. they were ripe, sweet, tart, of all different shapes and colors. so f***ing rad. seriously. above, i posted some food porn that i shot at my crib afterwords. this is another simple simple recipe that you can apply to any number of dishes as a side, a starter salad, or a lunchtime meal.

Heirloom Tomato Salad

6 or more ripe heirloom tomato's of different varieties and sizes cut into 4 or 6 segments, depending on size

2 or 3 tablespoons of good quality white wine vinegar

2 tablespoons of fresh chopped flat leaf parsley or fresh basil

sea salt and fresh cracked pepper to taste

a healthy drizzle of good quality olive oil

Instructions

1. combine all ingredients in a bowl and gently toss until everything is covered. set aside for 30 minutes to allow the flavors to merry. enjoy

i would like to dedicate this post to my good friend, and one hell of a guy, Roberto Ckarke.

Tuesday, September 1, 2009

Lentil Soup a la Colin (sort of)


despite me telling myself that i wouldn't let this happen, i haven't posted in some time. life's been a bit crazy though, so i hope my three followers will be forgiving.

one of the crazy things that has happened recently is that i finally got the stereo system from my parents house in Brampton. it was decided i should have it after dad passed away and i finally pried it away from the home of my sister (love you, suesy). its a beauty. all vintage gear from 1979 - 1982. its quite sharp, and it got me to thinking about my dad and whatnot... he was a great cook. he would make things like baccala stew and Guyanese pepper pot - a dish made from ox tail, pig tail, beef shoulder, and a concoction of secret spices that included something called cazrip; a fermented syrup, that is black in colour, made from the root of a cassava (yucca) plant. i don't know how to make those things, only he did (although, my mom makes a pretty good pepper pot these days). the only problem is i didn't get a chance to learn those recipes from him. you see, all those dishes took a VERY long time to make. in the case of pepper pot, its 3 days of cooking, seasoning, skimming fat, and adding liquid... at 18 i was more interested in quick, yummy, not so good for you meals like bbq chicken. i did however learn how to make one thing my dad made; split pea soup. i know, it doesn't sound like much but when i was growing up it was a winter staple at my house for its ability to "stick to your ribs" (not to be confused with porridge, which "puts hair on your chest"). the only thing i really remember my dad doing was cooking the garlic. he would take about 4 to 6 cloves of garlic and chop them until they were very fine. he would then take a steal soup ladle and fill it with the garlic and enough oil to cover the garlic plus a little more. then he would put the ladle right over the burner on med-low heat and cook it until it was dark brown. he would then dunk the whole thing right into the soup pot and it would let off a very dramatic and violent bubble and sizzle. as a young kid, it was pretty cool to watch go down. now, i dont recommend you do it this way, because dad once set the kitchen on fire using this method. i suggest doing it in a very small pot or a pan and just dumping the garlic in the soup. it really gives the dish an earthy smokeyness that goes great with the rest of the smells and flavours in the dish. this is a slight variation on the dish. i use red lentils and smoked turkey thighs instead of green split peas a ham bone. you can substitute the turkey thigh with the ham bone, but the lentils and split peas would be in different measurements, that i don't have at the moment. although i have changed some of the ingredients slightly, i would still like to dedecate this post to my old man, Colin.

Lentil Soup w. Smoked Turkey

Ingredients

1 smoked turkey thigh, bone in or bone out, whichever you prefer

2 cups red lentils

1 liter chicken stock

.5 liters water

1 large yellow onion, diced

2 large carrots, diced

2 stock celery, diced

4 large cloves or 6 medium garlic. get the freshest, most pungent garlic you can find.

few sprigs fresh thyme

2 dried bay leaves

oil for cooking veg

lots of olive oil for cooking the garlic

salt and pepper to taste

Instructions

1. to prepare the turkey, remove the skin and scrape with a knife, all the fat on the underside of the skin. roll it up and tie it with butchers string and reserve for the soup. with a butter knife, scrape ll the fat off the turkey thigh

2. put a large stock pot on a med-high burner. add oil to the pan and allow to heat through. add the onion and cook for 2 minutes. add celery, carrot, thyme, and bay leaf and cook until just soft. add the lentils and cook for another 1 or 2 minutes. you should see a little brown developing on the bottom of the pot. that's what you want.

3. add the stock and water and allow to come to a boil. add smoked turkey the turkey skin. reduce heat to low and simmer for 1.5 hours, string every 15 minutes or so. the consistency should be very smooth, with no hard bits of lentil at all.

4. turn another burner to medium and place a VERY small pan to heat up on top. add enough olive oil so that there is a 1/4 inch of olive oil on surface of the pan. once the oil is heated through, add the garlic. cook it until it is a very dark golden brown. DO NOT BURN THE GARLIC!!!! poor the garlic and oil directly into the soup pot. it spits up a lot and makes a hissing noise, so watch out. cook soup for an additional 30 minutes. check for salt and pepper and adjust to taste.

5. remove from heat and let sit for about an hour. this will help with the consistency of the soup. it should be thick, and uniform, but not gloppy. if it is, add a small amount of water. remove the turkey, turkey skin, and reserve. i like the skin, but it is an acquired taste. remove the bay leaf and thyme stems if you can find them.

6. stir the soup once more and serve hot in large bowls with a piece of the smoked turkey in the middle. enjoy :)

Sunday, August 16, 2009

BBQ Salt and Pepper Broccoli


broccoli is awesome. i hate that it gets a bad rap as a pedestrian or common veggie. it tastes awesome, has great texture, and you can prepare it in many ways. sure, it doesn't have the same distinguished history as say asparagus or the panache of the multi-colored sweet pepper, but it is a loyal provider that always comes through in a pinch. that's my kind of veggie. here is a recipe i have been using at all my bbq's all summer. it is seriously the only thing that is always on the menu. there is never any left overs and its quite possibly the easiest recipe i will ever post.

BBQ Salt and Pepper Broccoli

1 large head of broccoli cut into large pieces (you dont want them to fall through the holes in the grill)
lots of Salt Pepper
olive oil to coat

Directions

1. light the coals on your bbq and let run hot, or turn your bbq to high.

2. put the broccoli in a large bowl and add olive oil, salt, and pepper. toss to coat

3. add contents of the bowl to the grill and cook for 1 to 3 minutes a side, or until the edges just begin to char

4. remove from grill and serve immediately.

this goes well with anything that comes off the grill or is good on its own.

i dont have any good pictures, so the one above will have to do for now.

shout outs to skratch bastid who showed me this recipie

Tuesday, August 11, 2009

steak and eggs


ive been bugging out on bbq sauces since the summer started. ive tried about 40 different recipes that i got from friends, got from books/Internet, and some i just came up with myself by building off the other recipes i picked up along the way. for all my effort i think i kept 3 that i was really happy with. this entry is not about those sauces (ha!). it is instead about a more simple bbq. something that i have been working with over the past 2 weeks and i have been loving it. i made some slow bbq'ed Cornish hens for some of the lads last night with just some Chinese 5-spice that i served with a dressing inspired by the Portuguese Piri Piri sauce. but again, this entry isnt even about that meal. i wanted to get super basic for this one. im talking just salt and pepper. in my opinion, this simple take on bbq works best with big cuts of meat so you can pile the simple spice duo on thick. for dinner tonight i made a thick cut rib eye steak w. baby romaine and a slow fried egg on top. 2 things i would do different with this dish is, i would use a smaller cut of meat. i was done the egg and greens before i was done with the steak. the rest of which i am going to make a steak and cheese sandwich with tomorrow. a strip loin would have been perfect. the second is some crispy fried shallots on top for a little sweetness and a little texture. other than that, i was quite happy with my venture into a more simple way of the bbq.

Rib Eye Steak w. Baby Romaine and a fried egg

ingredients

1 rib eye, about an inch thick
2 large fists full of baby romaine
1 large fresh egg
vinaigrette
olive oil for frying the egg and for brushing the steak
lots of salt and pepper

directions

rib eye

1. light your charcoal and let coals heat until very hot or turn your bbq up to high and let heat for 10 minutes, until the grill is very hot.

2. season steak with lots of salt and pepper, and using your hand brush olive oil over both sides of the steak.

3. put the steak on the grill turning once after 4 minutes and removing after an additional 4 minutes for a total cooking time of 8 minutes for medium rare. remove the steak from the grill and let sit for 5 minutes

Baby Romaine

1. put 2 hand fulls of baby romaine in a large bowl and gently toss with your favorite home made vinaigrette. dont put too much because you dont want there too be too much acid. set aside.

fried egg

1. take a pan and put it on the burner at medium high heat. let it warm up for 2 minutes and add a little olive oil to the pan.

2. once oil has heated, add the egg and gently cook for 3 minutes if like me you like your yolk runny. i also dont flip the egg. instead i use the hot oil in the pan and spoon it over the top of the egg so it gently cooks the top. when egg is at your desired doneness, remove from the pan.

assembly for presentation.

the idea is to have some steak, greens, and egg in every bite. so lay your steak on the plate and cover with greens, then top the whole thing with the egg. season egg with fresh cracked pepper and a good quality sea salt. some of the romaine will wilt between the heat of the egg and the steak, which is perfect for mopping up any juice that runs out from the juicy steak. its not a new way to eat a steak, but it is a simple and very satisfying way to eat a steak. enjoy.

Friday, August 7, 2009


this is what i cooked for lunch today for me an my nephew. we skipped breakfast, so we didn't mind having such a large lunch. you can easily cook this for dinner and serve with polenta and a salad afterwards.

Cornish hen and tomato casserole

1 large cornish hen cut into 1/8ths
4 or 5 small carrots or 2 medium carrots, chopped
1 medium onion, diced
1 stock celery - top and bottom removed, chopped
half a can of Italian tomatoes, chopped (i used pastine) - reserve juice
1 clove garlic, minced
4 or 5 sprigs of fresh thyme, left whole
1 cup chicken stock
half a cup lardons
salt
pepper
oil for browning

1. heat oven to 350 and place a medium sized casserole dish, with lid, in there.

2. turn burner to medium high heat and place pan on top. heat for 3 or so minutes so the pan is very hot. add cooking oil to the pan and heat for 1 minute. add Cornish hen and brown on all sides then set aside in a bowl. drain about half the fat off being careful to reserve all the brown bits in the pan. reduce heat to medium. add onion to the oil and cook till soft, about 2 minutes. add lardons, garlic, celery, and carrots and cook for another 2 or 3 minutes, until veggies are soft. add stock and reduce by half. add tomato and juice and cook until heated through.

3. remove casserole dish from oven. remove top and add the hen and the contents of the pan. cover and cook for 45 minutes with lid on.

4. reduce heat to 300, remove lid and cook for an additional 15 minutes

5. remove from oven and let sit for 10 minutes. serve with bread, polenta, or over rice.